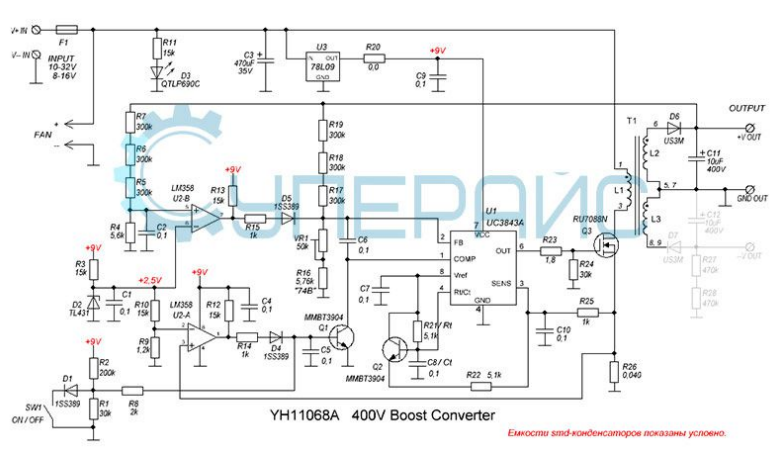
USBAsp v 2.0 firmware for flashing AT89S51, AT89S52

main.hex firmware with an inversion of RESET pin:

https://drive.google.com/file/d/1QiRvCN29H0l-Kq0eJhdKs3WfHdrvEXrB/view?usp=sharing

source code:

https://drive.google.com/file/d/1-idzOalAeA77U9Ony_UZ1YfTT4d_M8j3/view?usp=sharing

avrdude.conf

https://drive.google.com/file/d/1bEraBArDpIUMMW7dt0KzH7qNNhkQd99W/view?usp=sharing

TARGET=atmega8

HFUSE=0xd9

LFUSE=0x9f
You can just flash the MCU without fuses

env for PlatformIO

[env:AT89S51]

platform = intel_mcs51

board = AT89S51

upload_protocol = custom

upload_command = sudo avrdude -c usbasp -p at89s51 -U flash:w:$SOURCE:i -C +./avrdude.conf

Magento 2 debug layout xml

/etc/events.xml

<?xml version="1.0"?>
<config xmlns:xsi="http://www.w3.org/2001/XMLSchema-instance" xsi:noNamespaceSchemaLocation="urn:magento:framework:Event/etc/events.xsd"></event>
<event name="layout_generate_blocks_after">
    <observer name="layout_generate_blocks_after" instance="Module\Wishlist\Observer\Layout" />
</event>
</config>

Observer

<?php

/** * Create "Layout.php" at onlinecode/Dev/Model/Layout.php */

namespace Module\Wishlist\Observer;

use Magento\Framework\Event\Observer;
use Magento\Framework\Event\ObserverInterface;

class Layout implements ObserverInterface
{
    protected $set_logger;
    public function __construct(\Psr\Log\LoggerInterface $logger_cons)
    {
        $this->set_logger = $logger_cons;
    }
    public function execute(\Magento\Framework\Event\Observer $observer)
    {
        $get_xml = $observer->getEvent()->getLayout()->getXmlString();
        $this->set_logger->debug($get_xml);
        $get_writer = new \Zend_Log_Writer_Stream(BP . '/var/log/layout_block.xml');
        $get_logger = new \Zend_Log();
        $get_logger->addWriter($get_writer);
        $get_logger->info($get_xml);
        return $this;
    }
}

Magento 2 log all Mysql queries to log file

Edit file vendor/magento/framework/DB/Statement/Pdo/Mysql.php

            return $this->tryExecute(function () use ($params) {
                $writer = new \Zend_Log_Writer_Stream(BP . '/var/log/debugSql.log');
                $logger = new \Zend_Log();
                $logger->addWriter($writer);
                $logger->debug($this->_stmt->queryString);
                $logger->debug(json_encode($params));
                $logger->debug('================');
                return $params !== null ? $this->_stmt->execute($params) : $this->_stmt->execute();
            });

How to debug Magento 2 email templates

By help of a script you can send Shipment, Creditmemo etc emails how much you want

<?php
error_reporting(E_ALL);
ini_set('display_errors', 1);

use Magento\Framework\App\Bootstrap;

require 'app/bootstrap.php';

$bootstrap = Bootstrap::create(BP, $_SERVER);
$objectManager = $bootstrap->getObjectManager();
$state = $objectManager->get(Magento\Framework\App\State::class);
$state->setAreaCode(\Magento\Framework\App\Area::AREA_FRONTEND);
$objectManager = \Magento\Framework\App\ObjectManager::getInstance();

/** @var Magento\Store\Model\App\Emulation $emulation */
$emulation = $objectManager->create('Magento\Store\Model\App\Emulation');
$emulation->startEnvironmentEmulation(1, \Magento\Framework\App\Area::AREA_FRONTEND, true);


/** @var \Magento\Sales\Model\ResourceModel\Order\Creditmemo\Collection $shipmentCollection */
$collection = $objectManager->get(\Magento\Sales\Model\ResourceModel\Order\Creditmemo\Collection::class);
/** @var Magento\Sales\Model\Order\Creditmemo $subject */
$subject = $collection->getLastItem();


/** @var Magento\Sales\Model\Order\Email\Sender\CreditmemoSender $sender */
$sender = $objectManager->get(Magento\Sales\Model\Order\Email\Sender\CreditmemoSender::class);
$sender->send($subject);


$emulation->stopEnvironmentEmulation();
echo "Done";

How to debug Magento 2 code with one file?

You can debug a lot of Magento 2 functions/logic with the help of only one script!
<?php
error_reporting(E_ALL);
ini_set('display_errors', 1);

use Magento\Framework\App\Bootstrap;

require 'app/bootstrap.php';

$bootstrap = Bootstrap::create(BP, $_SERVER);
$objectManager = $bootstrap->getObjectManager();
$state = $objectManager->get(Magento\Framework\App\State::class);
$state->setAreaCode(\Magento\Framework\App\Area::AREA_FRONTEND);
$objectManager = \Magento\Framework\App\ObjectManager::getInstance();

/** @var Magento\Store\Model\App\Emulation $emulation */
$emulation = $objectManager->create('Magento\Store\Model\App\Emulation');
$emulation->startEnvironmentEmulation(1, \Magento\Framework\App\Area::AREA_FRONTEND, true);

foreach (range(1, 1) as $shipId) {

    /** @var Magento\Sales\Model\ResourceModel\Order\Shipment\Collection $shipmentCollection */
    $shipmentCollection = $objectManager->get(\Magento\Sales\Model\ResourceModel\Order\Shipment\Collection::class);
    /** @var Magento\Sales\Model\Order\Shipment $shipment */
    $shipment = $shipmentCollection->getItemById($shipId);

//$shipment->setSendEmail(1);

    /** @var Magento\Sales\Model\Order\Email\Sender\ShipmentSender $sender */
    $sender = $objectManager->get(Magento\Sales\Model\Order\Email\Sender\ShipmentSender::class);
    $sender->send($shipment);

    /** @var \Magento\Sales\Model\ResourceModel\Order\Collection $orderCollection */
    $orderCollection = $objectManager->get(\Magento\Sales\Model\ResourceModel\Order\Collection::class);
    /** @var Magento\Sales\Model\Order\Email\Sender\OrderSender $sender */
    $sender = $objectManager->get(Magento\Sales\Model\Order\Email\Sender\OrderSender::class);
//$order=$orderCollection->getItemById(26);
//$sender->send($shipment->getOrder());
//print_r($order->debug());
//echo "\n".$order->getCustomerEmail();

}

$emulation->stopEnvironmentEmulation();
echo "Done";

Controlling Vivitek projector via Arduino Part 1 (decoding)

I has situation when 3 Vivitek’s RC remote controls doesn’t work. So I decided to make my own IR remote control.

Remote uses NEC protocol. Arduino uses IRremote library. I have wired TSOP receiver to the Arduino and dumped some codes.

Here are the commands:

Power on/off

Protocol=NEC Address=0x31 Command=0x81 Repeat gap=94450us

Protocol=NEC Address=0x31 Command=0x81 Repeat gap=94500us

Menu

Protocol=NEC Address=0x31 Command=0x87 Repeat gap=94450us

Protocol=NEC Address=0x31 Command=0x87 Repeat gap=94500us

Up

Protocol=NEC Address=0x31 Command=0xC1 Repeat gap=94450us

Protocol=NEC Address=0x31 Command=0xC1 Repeat gap=94400us

Down

Protocol=NEC Address=0x31 Command=0xC2 Repeat gap=94450us

Protocol=NEC Address=0x31 Command=0xC2 Repeat gap=94450us

Left

Protocol=NEC Address=0x31 Command=0xC3 Repeat gap=94450us

Protocol=NEC Address=0x31 Command=0xC3 Repeat gap=94450us

Right

Protocol=NEC Address=0x31 Command=0xC4 Repeat gap=94450us

Protocol=NEC Address=0x31 Command=0xC4 Repeat gap=94450us

Enter (Ok)

Protocol=NEC Address=0x31 Command=0xC5 Repeat gap=94500us

Protocol=NEC Address=0x31 Command=0xC5 Repeat gap=94500us

Keystone 1

Protocol=NEC Address=0x31 Command=0x85 Repeat gap=94450us

Protocol=NEC Address=0x31 Command=0x85 Repeat gap=94500us

Keystone 2

Protocol=NEC Address=0x31 Command=0x84 Repeat gap=94450us

Protocol=NEC Address=0x31 Command=0x84 Repeat gap=94400us

Source

Protocol=NEC Address=0x31 Command=0x83 Repeat gap=94450us

Protocol=NEC Address=0x31 Command=0x83 Repeat gap=94450us

Auto

Protocol=NEC Address=0x31 Command=0x86 Repeat gap=94500us

Protocol=NEC Address=0x31 Command=0x86 Repeat gap=94500us

Mute

Protocol=NEC Address=0x31 Command=0x89 Repeat gap=94500us

Protocol=NEC Address=0x31 Command=0x89 Repeat gap=94450us

Freeze

Protocol=NEC Address=0x31 Command=0x8E Repeat gap=94450us

Protocol=NEC Address=0x31 Command=0x8E Repeat gap=94500us

Plus

Protocol=NEC Address=0x31 Command=0x8C Repeat gap=94450us

Protocol=NEC Address=0x31 Command=0x8C Repeat gap=94450us

Minus

Protocol=NEC Address=0x31 Command=0x8F Repeat gap=94450us

Protocol=NEC Address=0x31 Command=0x8F Repeat gap=94450us

Watch for other parts…to be continued